
Articles:
- history lessons of the various items/implements and the decor
- spotlight on various bloggers/shops
- We need contributors in prim/country/Americana/folk art; shabby chic; cottage style; Victorian; eclectic; mixed media/altered art; vintage; diy; thrifting/junking; French
- tutorials; free epatterns
- Q & A
- classifieds - sale, swap, etc.
If you would like to contribute an article, please email me at iluvffmn at yahoo d0t com with the subject line of "Ezine article." You would get a link back to your site(s) whenever you contribute an article, which would mean more exposure for you. This could be a monthly writing gig or a one-off.
This month's contributors are Gen from Olde Pear Primitives; Kat from Kat's Nature; Christine from Crafty Geordi; Cindy from Cynthia Lee Designs; and yours truly from Screaming Sardine.
Shoo Fly Tutorial
by Gen from Olde Pear Primitives

I was a little hesitant to post this because of my husband. He had said if I did a tutorial no one would want to buy one from me. But I thought, you know it's not fair to people out there who really want to make one and can't find the information they need. I too was looking everywhere online for how to make one. And no one had a tutorial. They were just selling them. So, I am going to post this and in the hope it will help someone out. I hope it will help YOU to make your own if you want. I am not saying you should not buy one. By all means there are plenty of beautiful ones out there. I am just giving you some ideas on how to make one if you are interested in doing one yourself. Ok, onto the fun part.
Lets begin.
What you will need:
1. A strainer (try to look for one with the handle connected to the rim on the OUTSIDE of it. Not connected IN it. You'll see what I mean with the pictures below) or a pre-made shoo-fly from a store like Hobby Lobby.
2. You will need pliers for removing the metal handles on the metal strainer. (omit this if you are using a different type of strainer or you are using a pre-made one.)
3. You will be using my faux rust technique, so grab the primer and rustic umber. On these shoo flies I used Autumn Brown.
4. A wooden knob or your knob of choice (I used old kitchen cabinet knobs).
5. And lastly, if you are going to be using the strainer with the plastic rim you will need jute rope.
Ok, here are the three different types of strainers I have used in this tutorial. You can choose which one you would like to try.

The one on the left is the pre-made one from Hobby Lobby. The one in the middle is a large strainer with a plastic rim. And the one on the right is the metal one. Make sure its the one with the handles ATTACHED to the rim. I like this kind because it doesn't leave holes. If you can't find one then by all means use the ones with the handles attached on the inside. To cover up those hole you can use some wire and wrap it through the strainer and around the hole to make it look like a repair. Those are great looking too!

This is what I mean that the handle is attached to the rim.
If you are going to use the one from Hobby Lobby remove the flowers from it completely.

Once you have all the flowers removed from the cover remove the ones on the rim and handle.


Now that it is stripped of the flowers and trim you can now prime it with your primer. Once dry, paint the cover with your Rustic Umber or Autumn Brown. Then if you like you can wrap some twine around the handle for a more prim look. And then you're done.


I added some rusty wire to this shoo fly by attaching it to the underside of the handle going to the rim.


Now if you are going with the plastic rim strainer you will need to remove it from the plastic rim.

You may find that you have to work the mesh a little. But once it gives it is pretty easy to pull away from the plastic rim.

Here it is with the plastic rim removed. At this time I put my knob on. I primed it and painted it altogether with the cover. But, if you have a wooden knob ,you can paint it and add it later.

Once primed you can then spray it with your Rustic Umber and or Autumn Brown. Add your knob to the top. (If you used a kitchen cabinet knob then it should already be on.) Then with this one I used jute rope to line it and create a rim for it. I just glued the rope all the way around it. But you can choose not to use one at all. It still looks very prim.


Now to the tough one. I am not going to lie. This sucker was hard.

I had a tough time removing the handles from the rim. I didn't have a blow torch so I just popped it in my oven. I didn't have it on the highest setting because at the time I had a pantry cake in there. So, it was on 170. But I had it in there for quite some time. You can put it in your oven at a higher temp. You just want to help soften the metal so you can work it off better. But if you have a blow torch then go ahead and use it. It might be easier. But whatever works for you use it. This just worked for me.
After I took it out of the oven
(Be careful when removing, it will be VERY HOT!)

Once taken off you are ready to prime. After it is primed and dry, go ahead and spray it with the Rustic Umber paint or Autumn Brown.


Add your knob of choice and you're done!
Well, there you go. I gave you three choices to work with. I hoped I have helped you with this tutorial. All I ask is that you do not claim this tutorial or pictures as your own. If you do decide to put it on your blog or website you need to give me (Genevieve @ Olde Pear Primitives) credit for it and link it back here. For all the work I have done on this tutorial it would not be fair of you to claim it as your own. Plus, the blog fairies will get you. And you don't want that.


This work is licensed under a Creative Commons Attribution-NonCommercial-NoDerivs 3.0 Unported License
Folk Art
by Kat from Kat's Nature
I plan to show you all about some of the different styles "Folk Art." I really want to explore new folk artists and what new things are out there. I have had painting experience with a folk artist in Virginia, but I consider myself a "self styled folk artist". I am by no means a learned expert. I just tend to love folk art and nature art. Others may have different ideas...but lets just say this is going to be my ideas and my thoughts on folk art....through my eyes and my mind. Please enjoy and let me know your thoughts.
Well... as you may have guessed, I plan to start right here with myself. The nicest, most laid back person I ever interviewed. My art is basically a lot of birds to begin with. Some are painted , some are simplistic wooden sculptures.

I start with an old piece of wood, add a pencil sketch
of a bird and some flowers.

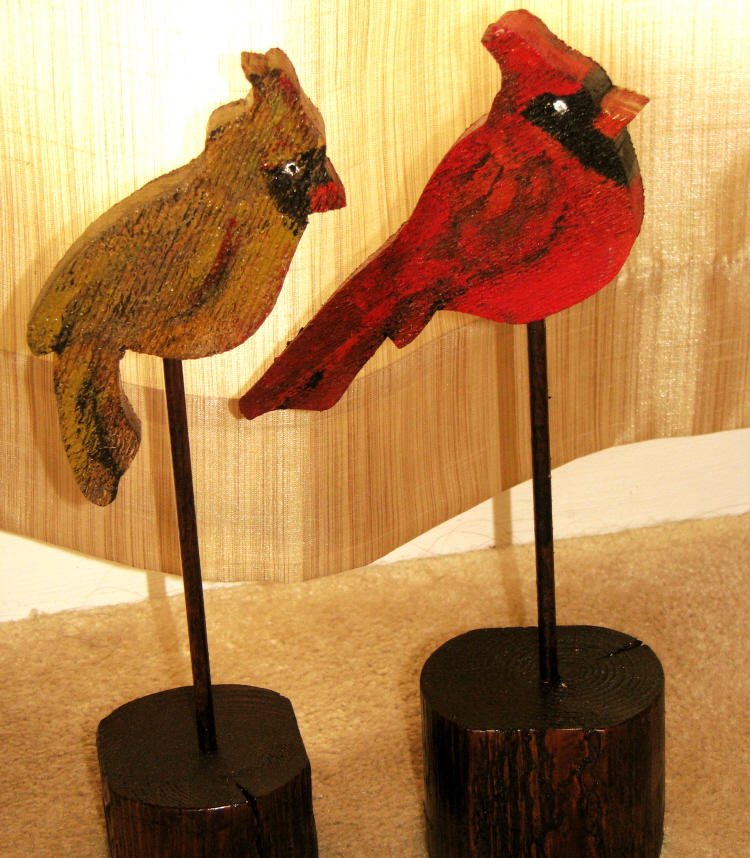
Then I just start adding color. These two are done with oil paints. I used a scrubbing technique with a stiff brush.

This is the end result A pair of oil painted cardinals to hang on my wall.
To me folk art usually comes from a self taught artist. Folk art tends to be created with the earthy, natural, simplistic subjects and is often very primitive in style. It could be a sculpture made from natural items found in the woods.

I used some old tree bark as a base.

And here is more bark.
It could be a painting ...


It could be fiber art, wooden art, or paint art.


I like to see simplicity and a relaxed style for me to feel it is a good example of "Folk Art".
Here is a water coloring of a bird and flowers.


I added pen ink to define and add interest.
So that is some of my own art, and next month I hope to have a new folk artist to showcase. I have a few in mind, but if you have someone in mind, please let me know where I can check out their work.
KAT
DIY Furniture Makeover
Christine from Crafty Geordi
How many times have you been to a garage sale or a thrift store and seen a beaten up piece of furniture? If you're like me, thats more times than you can count! I cannot begin to tell you how many coffee tables or end tables with coffee cup rings, peeling laminate and bad paint jobs I have found.
I recently came across such a piece of furniture at a garage sale. She just looked sad and past her prime. I was opening the drawers and the bottom one didn't open. The owners showed me that the drawer doesn't open but it swings inside out! You know, like the secret room behind the bookshelves. But much, much smaller.

As far as I can tell, this is a small sewing table. I believe that these dowels are for holding thread. I can say that I have never before seen anything like it. And I was intrigued. I wasn't into the price of the table though. I got this cutie for $10 after talking them down from $20. Remember, unless you really have to have it, don't be afraid to walk away. Its okay to come back to the sale later in the day and try again for a better price. I was walking away, prepared to come back later when I got my $10 price.
 |
| A power sander is a fantastic investment if you plan to refresh furniture. It can save hours of work and its fun to use. |
I took her home and immediately got to work on her. I began by sanding off the entire finish. I used my power sander then used a damp rag to clean off the dust. On this pretty lady I applied a dark stain using a foam brush. I did skip a critical step and it shows in the end result. I didn't use a wood conditioner first. I will definitely use this next time. Wood conditioner can be found along with the wood stains in the paint section of your hardware store. Apply the stain liberally. After letting the stain sit for 15 minutes you will want to use an old rag and wipe off the extra stain. Let her dry for 24 hours to make sure that all of the stickiness and tackiness is gone. At this point I applied 2 coats of a spray on polyurethane. There is also a brush-on variety of the polyurethane. These are also sold along side the stains.
Lastly, I added new drawer pulls and that was it. The total cost of this little table was in the ballpark of $30. A little elbow grease and a couple of dollars and I have myself a total gem.
 |
| I chose the drawer pulls because the warm color of the metal ties in with the warm red tones in the stain. |
 |
| I left the storage area untouched. Like any good hidden room, no one is going to see it unless invited. |
 |
| I just love the way the smooth top reflects light. |
If you are thinking of refreshing furniture, consider going by my own self-imposed rules:
- Don't spend too much on your item. Sometimes these makeovers just don't go well. It's much easier on the psyche of you've "wasted" $5 rather than $100.
- If your project is a total bust, it is still not wasted. It is a valuable learning experience.
- Don't be afraid to try something new. You might be very pleasantly surprised. I recently painted a desk with chalkboard paint and shiny red legs. I think that it is okay-cute but my niece and nephew loved it and my sister was pretty impressed.

~Using Old Windows As Wall Decor~
by Cindy of Cynthia Lee Designs
If you are like me…you love to decorate your home, but you need to do it within a budget. This past February, we purchased a corner fireplace for our living room and that meant we needed something to hang on the walls above it. I wanted something pretty, but nothing too fancy or too expensive. So that got me thinking about whether or not I had anything already here at home that I could use. Then I remembered that we had a shed full of old windows that were given to me from a relative who does home remodeling. I wondered if they would look good above the corner fireplace. So I cleaned them up a bit, but not so much that they lost their old charm and then hung them up. These old windows were instantly turned into simple but beautiful wall decor.

I put mine up in the living room, but you could also display one in the bedroom. My friend Linda hung this huge arched window above the bed as a focal point.

Or how about leaning a large window up against the wall that has a painting in each frame. This window makes a great focal piece...your eye is drawn right to it when you enter Linda's living room. You could even put photos from a trip you've been on or pictures of family behind the glass.

If you love to do machine embroidery like I do or even hand embroidery...here is another way that an old window can be used as wall decor to showcase your embroidery designs. This wonderful piece is hanging in Linda's living room.

How about putting an old window on an outside wall of your home and changing it out for the seasons like my mother-in-law has done at her home.

Now if you don’t know someone in home remodeling or the window replacement business...don't worry, because you can find old windows for reasonable prices at flea markets, junk shops, salvage yards, thrift stores, yard sales, and sometimes out at the curb on trash night for free. And if you are lucky enough to find several old windows...how about making one of these. It is on my list to do very soon!

Hope this inspires you to hunt for some old windows to turn into wall decor for you home.
~Cindy~
Cynthia Lee Designs
How to Make Dessert Looking Soy Tarts
by Tracy of Sunburnt Cow and Screaming Sardine
Here's a tutorial on how to make dessert looking soy tarts that I posted on one of my old blogs a few months ago - how to make dessert looking soy tarts. Of course, it's best to use a scent that is something yummy and dessert-like. I used Chocolate Brownie for these.
I'm not going to spend time on how to do all the melting and such, since this tutorial is primarily showing how to make a different looking soy tart. Making candles is super easy (easy enough for me to do, so it MUST be easy)! There are some very good tips over at Nature's Garden Candles on how to make candles. Once you get the basics down, you'll feel more comfortable experimenting around with making soy tarts. I just think of them as wickless candles.
You don't really need any fancy molds, though I did use one for the walnut on top.


All I used was toilet paper rolls and a small yoohoo or juice box...box for the molds.

I threw out the top one since it had little dents that made it not all that circular. The lower two were better, since I was going for a little brownie bite type of look.
After I melted the wax, I poured just a little bit into a pie tin. (Make sure there are no holes in it.... I forgot to check...OOPS)! Pour enough wax to have a thin layer covering the whole bottom.

Put the toilet paper rolls in. By the way, I cut them in half and put the cut half up, so the halves with the straighter edge would be in the wax. You're only going to be filling up an inch or less, so you don't need the entire roll. Plus, you get twice as much out of this "trash" item!

Wait until the wax in the pie pan cools off enough to harden. In this way, it'll help hold the hot wax that you'll be pouring in. Otherwise, it seeps all over the place, even if you tape it up, line it with wax paper, etc. (I learned the hard way!)

Then pour just a little bit of hot wax into one toilet paper roll. Wait to see if it'll seep out. If not pour a little bit into the next roll. Wait, and then repeat with the next. Let those first layers cool, and then repeat by pouring just a little bit, waiting, etc.
Wait until these harden. I usually wait a day, but I'm sure several hours would be fine. You'll probably have plenty of wax left, and that's okay. Just keep it in your pot and remelt it for the next step.
Once your toilet paper and juice box molds have hardened, carefully peel the molds off.

Then melt some more wax. You may have to add more wax and fragrance oil according to how much you have left from the previous step. (This is where some experience in candlemaking helps). Once it's fully melted, you play the waiting...and waiting...and waiting game. I think it took me probably an hour for the next step: grainy!


Then when it gets really thick...

you quickly start glopping it on to your base. You can even wait until it gets thicker and treat it like a thick frosting. Note, though, that once the wax starts thickening, you have to move fast because it gets thicker and thicker.
And there you have a tutorial on how to make dessert looking soy tarts. Since I haven't used other types of wax, I have no idea if they get grainy like soy wax does. If someone knows, please post a comment!
Question and Answer
I got this while "junking" around. I have no idea what it is. It looks like a wooden trench, but I'm wondering if it is used for anything special. It's pretty sizable at around a foot deep and two feet long. Does anyone have any ideas? (You can click on the pictures to enlarge them).
Upside down

right side up

and inside


Love your new Ezine - thanks to everyone who contributed.
ReplyDeletelove it all !
ReplyDeleteGreat information. Congrats on the first Ezine issue - looking forward for the next one.
ReplyDeleteThis is great! Thanks for the fun info!
ReplyDeleteWow, what a great start! Wonderful tutorials and informative articles, I love it! I think your "junking" treasure is a dough bowl. What a beauty! They were used in days gone by to put your bread dough in to proof before baking. Very sought after so you have a great find there, especially given it's size! Looking forward to your next edition, Deb
ReplyDeleteWhat a great idea. Thank you so much for all of the tutorials and pictures. I learned something new today, about soy wax getting grainy so that you get that
ReplyDelete"desert" look. I agree with Deb, I have my grandmother's dough bowl from South Carolina, my mother & father visited,they said she made her biscuits in it.
Warm Regards,
Susan B., Western MA
Awesome articles and tutorials!!! Great job on your first Ezine! Keep up the good work!
ReplyDeletePrim Blessings
Robin
Love it. Great if you can keep this running....always love a good E-Zine...specially a Prim one since I am in the UK and it's hard to find what I like
ReplyDeleteThis is just totally awesome, Tracy! I love the featured blogs...some of my favs are right here together! Thanks for the fun and all of the great ideas! ♥
ReplyDeletelove all the wonderful ideas shared.;)
ReplyDeleteLots of great tuts and photos and info there! Can't wait to see more. :)
ReplyDelete